- Read Tutorial
- Watch Guide Video
In this lesson, we are going to see the uploader work. We already have the application connected to the S3 API and all of the model components setup. Now we simply need to integrate the HTML elements in the form, and for this we're going to take advantage of the Rails form helper for file uploads.
Go to app/views/posts and open a file called _form.html.erb In this file, we have to make a change on line #20. The existing code is <%= f.text_field :image %> and we have to change it to:
<%= f.file_field :image %>
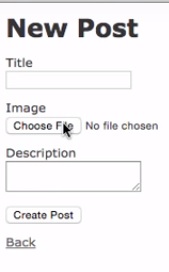
This is taking advantage of the Rails form helper method: file_field. Next, start the rails server and go to the browser. When you type the URL "localhost:3000", it will ask you to create a new post. Click on that link and create a new record. In this page, you can see that the text field of the image is automatically switched to a file upload button.
Once you fill the details and click on the "Create post" button, you'll be redirected to this page.

Now, if you're wondering what this long URL is, it's the value that gets returned from our AWS server.
To test, copy this URL and paste it in the browser. This should bring up the image you uploaded.
If you look at the URL closely, you can identify some important things. The first part of the URL that says "photoflash-development" refers to the bucket that is being called. From there on, you can see the path of the file, name, date and credentials. The good part about this URL is its dynamic, so people can't hack into your account or take your image easily.