- Read Tutorial
In this guide we'll walk through how to integrate a payment feature into a Rails application using the Stripe payment service. In other guides we'll go through more advanced features, such as having a payment form, dynamically creating plans, and creating subscriptions. For this lesson we're going to build:
The API connector between the application and
StripeThe ability for users to enter their payment information
A number of custom features, such as how to accept Bitcoin, configuring default values sent to Stripe, and much more
We'll be starting out by following the instructions from Stripe, however after we have the system working I'll show you how we can refactor the code so it's more flexible.
Starting application
We'll be starting out with an application that has the Devise integration and Post scaffold already built out (you can go through the Devise Guide here), you can pull down the starter code here
Configuring Stripe
Now let's start the process of integrating Stripe. Start by adding the gem to the Gemfile
# Gemfile

gem 'stripe'
After running bundle we'll have access to the gem's modules. Let's create an initializer file that will run each time the server starts up and sets our Stripe API connectors:
touch config/initializers/stripe.rb
In that file you can add the following configuration code:
# config/initializers/stripe.rb

Rails.configuration.stripe = {
  :publishable_key => ENV['PUBLISHABLE_KEY'],
  :secret_key      => ENV['SECRET_KEY']
}

Stripe.api_key = Rails.configuration.stripe[:secret_key]
We'll need to include these environment variables securely, let's install the dot-env gem to handle this for us. Add the gem to the Gemfile and run bundle:
# Gemfile

gem 'dotenv-rails', :groups => [:development, :test]
Now let's create the file that will store our environment variables:
touch .env
Add this file to your .gitignore file since you wouldn't want to share your secret keys with the world:
# .gitignore

# Ignore environment variables
.env
You can verify that this is working by going to the terminal and typing git status, it shouldn't list that the .env file at all. Now add in the secret keys to the .env file with the syntax:
PUBLISHABLE_KEY="Your publishable key from stripe here"
SECRET_KEY="Your secret key from stripe here"
You can get your keys by signing up for a Stripe account. That's it for setting up the Stripe configuration, nice and easy, right?
Creating a charges controller
Following the Stripe prescribed pattern, let's create a charges controller that will let us take advantage of RESTful routes and data flow and let us work with the Stripe API, run the following generator:
rails g controller charges new create
This will generate the controller and give us the controller actions of new and create. Let's update the routes file like below:
# config/routes.rb

Rails.application.routes.draw do
  resources :charges, only: [:new, :create]
  devise_for :users
  resources :posts
  root to: 'posts#index'
end
These two resource routes for charges will map directly to the actions that were generated with the controller. Now let's implement a basic version of the code in the controller:
# app/controllers/charges_controller.rb

def new
end

def create
  @amount = 500

  customer = Stripe::Customer.create(
    email: params[:stripeEmail],
    source: params[:stripeToken]
  )

  charge = Stripe::Charge.create(
    customer: customer.id,
    amount: @amount,
    description: 'Rails Stripe customer',
    currency: 'usd'
  )

rescue Stripe::CardError => e
  flash[:error] = e.message
  redirect_to new_charge_path
end
This is way too much code for the controller's create method, however our first priority is to get this working, we'll refactor this code into its own class at the end of the guide. So what is this code doing? Let's walk through it step by step:
It's setting a default amount that will be charged
It's creating a stripe customer, the
Stripe::Customer.createcode is a call to thestripegem. Here it's passing the customer's email address and thestripeTokenin as arguments.Then it calls the
Chargemodule, passing in a number of attributes that we want to pass to Stripe's API.Lastly it catches any errors and redirect the user to the
newpath if any errors occur.
Creating the payment form view
With the controller and routes taken care of to handle the data flow, let's implement the payment form. First create a few new pages:
touch app/views/charges/new.html.erb
touch app/views/charges/create.html.erb
The new view will show the form and the create view will be our Thank you page.
And add in the following code that connects to the Stripe JavaScript code:
<!-- app/views/charges/new.html.erb -->

<%= form_tag charges_path do %>
  <article>
    <% if flash[:error].present? %>
      <div id="error_explanation">
        <p><%= flash[:error] %></p>
      </div>
    <% end %>
    <label class="amount">
      <span>Amount: $5</span>
    </label>
  </article>

  <script src="https://checkout.stripe.com/checkout.js" class="stripe-button"
          data-key="<%= Rails.configuration.stripe[:publishable_key] %>"
          data-description="A month's subscription"
          data-amount="500"
          data-locale="auto"></script>
<% end %>
This form communicates with the Stripe JavaScript code, which handles the process of rendering the form and it passes in some key values, such as:
The
publishable_keyThe product description
The amount
And the
locale, which dictates the currency that will be rendered in the form.
It's important to realize that none of these items have anything to do with the code in our controller, these are simply arguments passed into the form so it knows what to render to the user. For example, if you change the data-amount value it won't override the value that will be charged to the user, that's handled in the controller, during our refactor stage I'll show you how you can make sure these items always match.
In the create.html.erb file let's add in some code for our thank you page:
<!-- app/views/charges/create.html.erb -->

<h2>Thanks, you paid <strong>$5.00</strong>!</h2>
Creating a Charge
With all that setup let's test it out, startup the rails server and navigate to localhost:3000/charges/new and you'll see:

If you click the Pay with Card button it will pop up a modal where the user can enter in their payment information (great UI for such a small amount of code written on our side):

You can use test data to fill out the information, Stripe has a few requirements for their test data:
Email - this should be your email address
CC Number - for a working test card use
4242424242424242Expiration Date - any valid date in the future
CVV code - any three digit code
Entering that in and you'll see that it processed the charge and redirected us to the thank you page.

We can confirm that this worked by opening up the stripe dashboard and seeing if it picked up the charge:
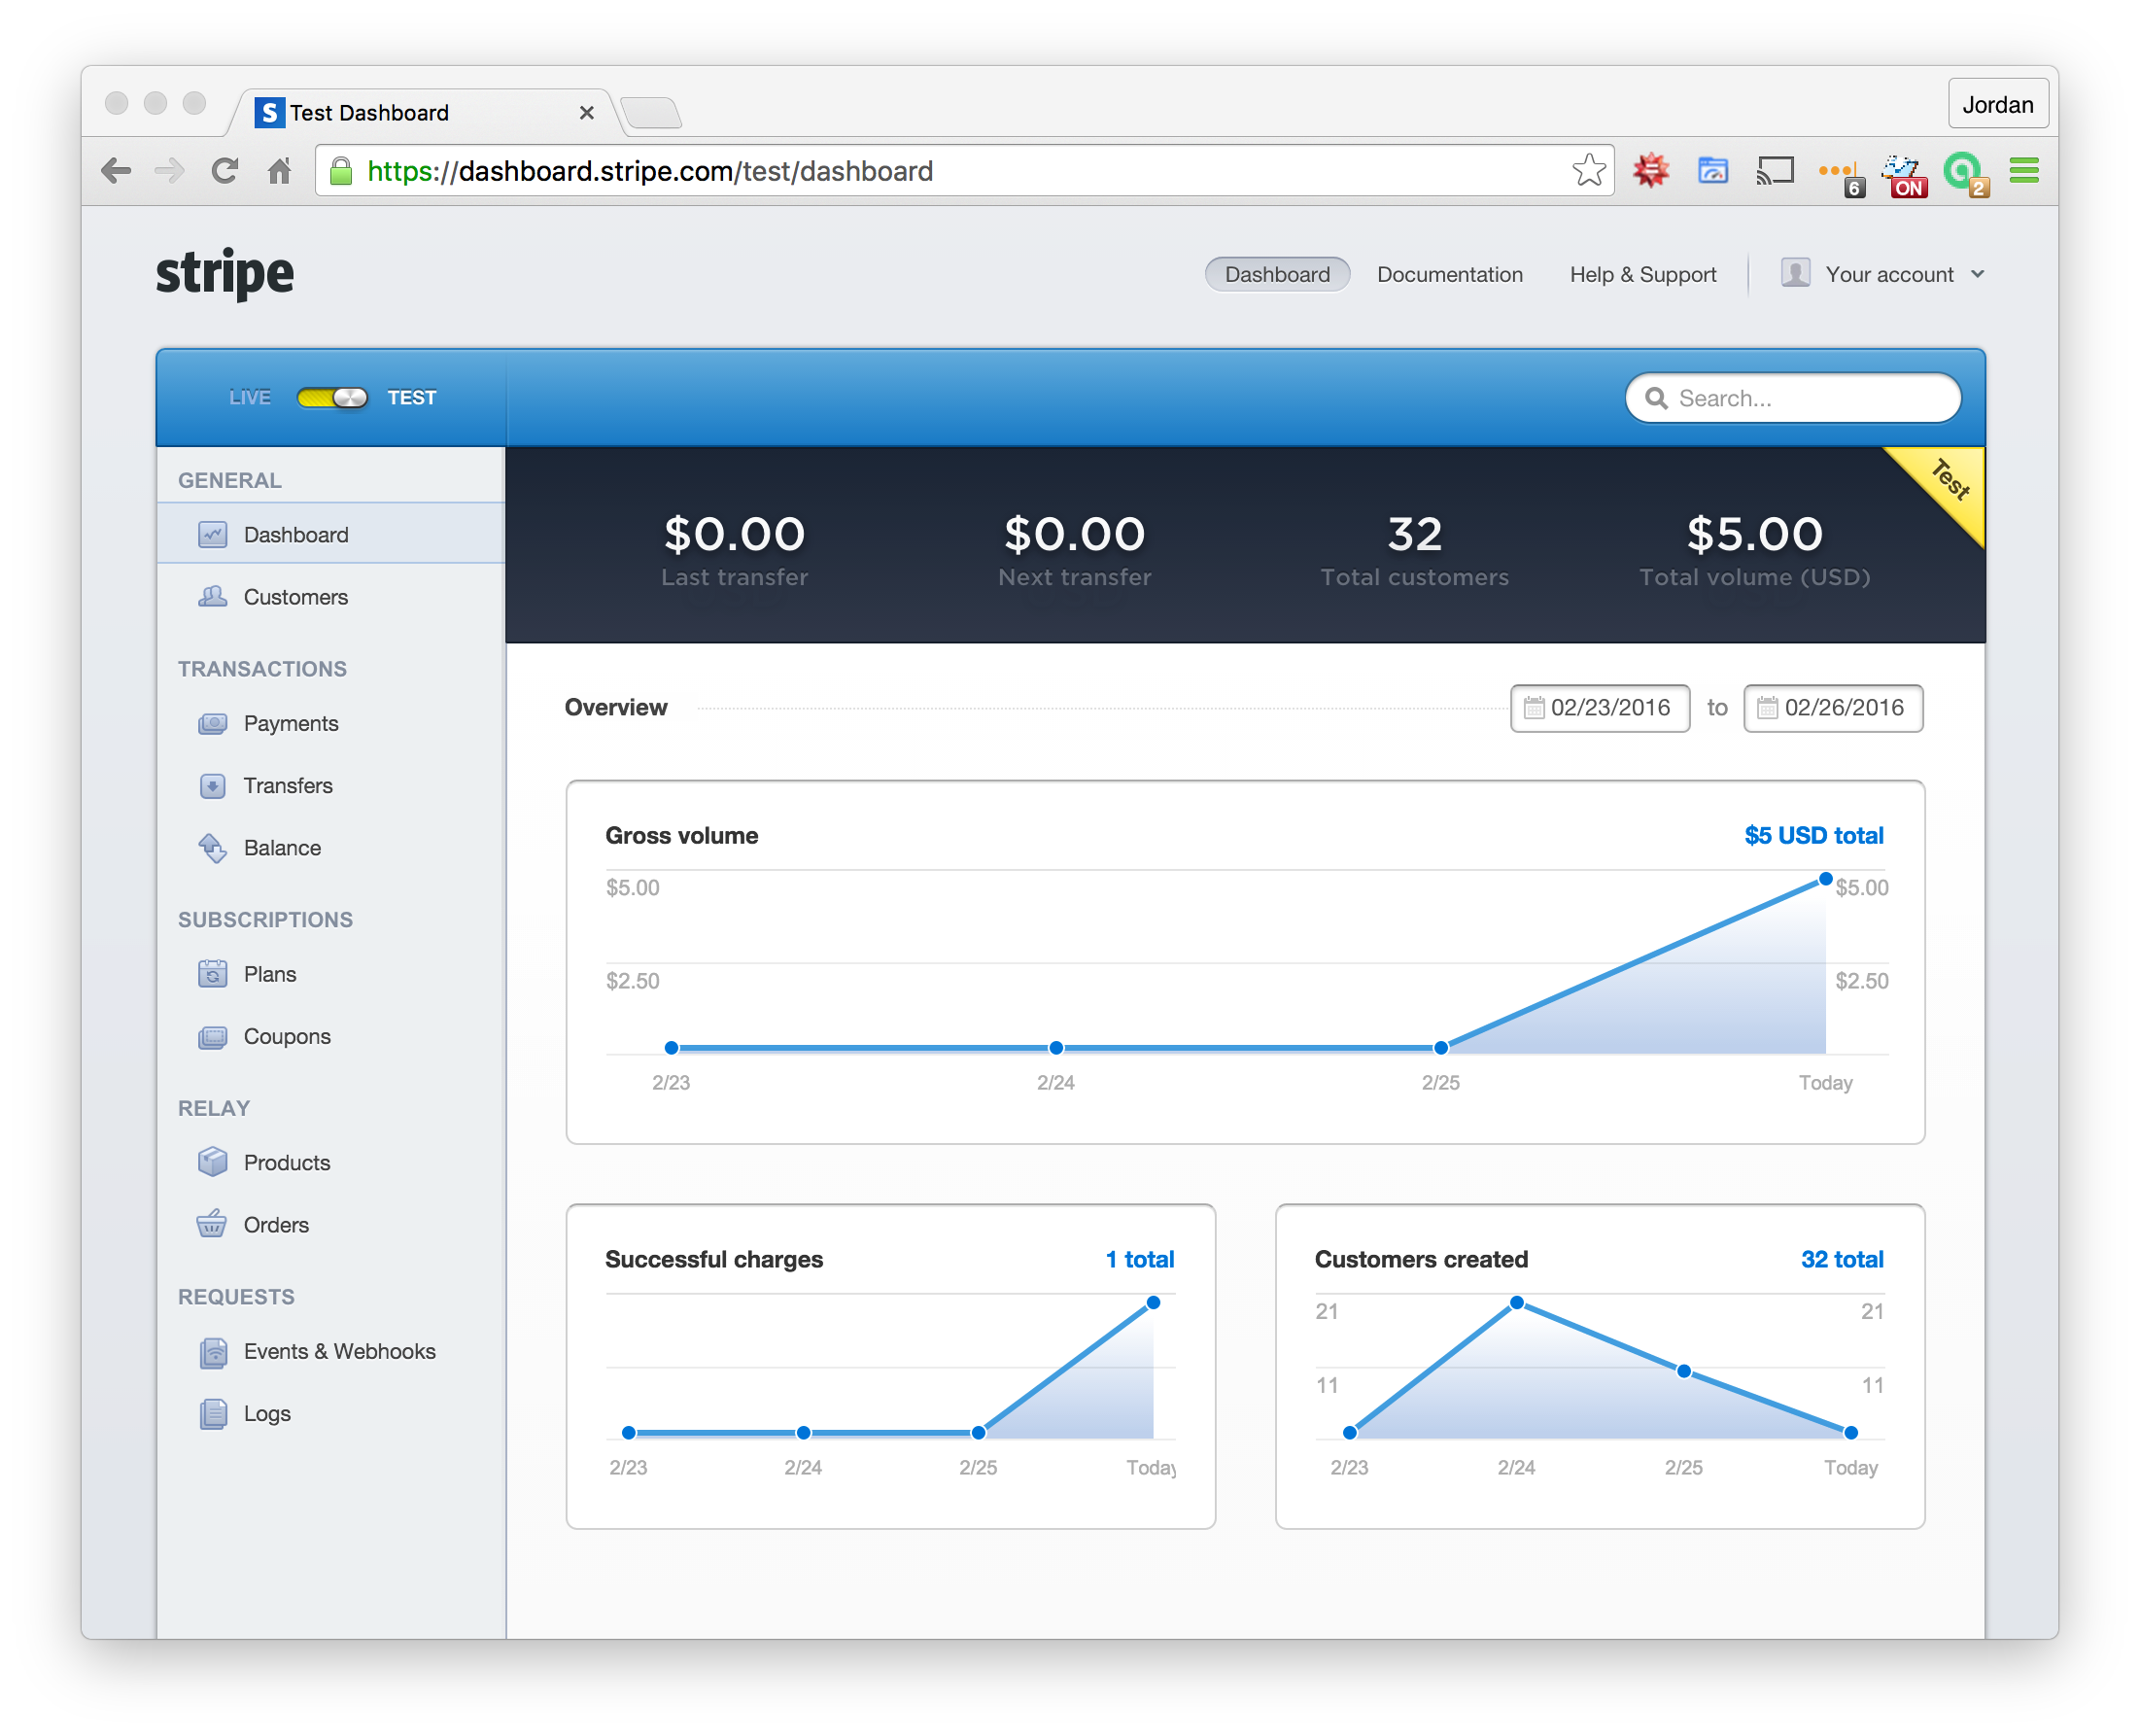
Nice, we're in the money!

Refactor
Now that we have that working, let's refactor the implementation so it's more flexible and follows best practices. Let's list out what we want accomplished in the refactor:
Move the logic out of the controller into a custom class for the charge feature.
Make the amount charged and product description dynamic and shared throughout the charge process
Create a true thank you page so that users aren't forwarded to a URL called
createForce users to be signed in before purchasing and pre-populating the email address sent to stripe instead of having to force the users to type it in manually
Add in the ability for customers to pay with Bitcoin instead of a credit card
With this list in mind, let's implement each of these refactors, starting with the largest.
Move the logic out of the controller into a custom class for the charge feature
In Ruby development, it's considered a best practice for methods to only have a single goal (take in data, output data, run a process, etc). If you take a look at our create method it's performing multiple tasks, some of which are pretty important features. Let's create a new module that will handle all of this logic and then this charges controller can simply call the module's methods:
touch app/models/concerns/stripe_tool.rb
Now let's list out what methods should be in this module, there are two key features that should be split out namely:
Creating a new Stripe customer
Creating a new charge
That's a pretty good start, let's simply add some empty methods for these two tasks in the StripeTool module:
# app/models/concerns/stripe_tool.rb

module StripeTool
  def self.create_customer
  end

  def self.create_charge
  end
end
I added self to each method because I want to be able to call them from the controller with the syntax StripeTool.create_charge instead of having to instantiate the module separately. So what do we do next? Let's pull out the functionality from the controller's create action and split it into these two methods. Keep in mind our module won't know what params the view is passing the controller with the params method, so we'll need to add arguments to the module methods:
# app/models/concerns/stripe_tool.rb

module StripeTool
  def self.create_customer(email: email, stripe_token: stripe_token)
    Stripe::Customer.create(
      email: email,
      source: stripe_token
    )
  end

  def self.create_charge(customer_id: customer_id, amount: amount, description: description)
    Stripe::Charge.create(
      customer: customer_id,
      amount: amount,
      description: description,
      currency: 'usd'
    )
  end
end
This organizes our code much better than it was before, these two processes are separate and now can be called separately. Imagine that we need to create customers at another spot in our application, now we can simply call this new create_customer method instead of copying and pasting code. Now let's update the controller:
# app/controllers/charges_controller.rb

class ChargesController < ApplicationController
  def new
  end

  def create
    @amount = 500

    customer = StripeTool.create_customer(email: params[:stripeEmail],
                                          stripe_token: params[:stripeToken])

    charge = StripeTool.create_charge(customer_id: customer.id,
                                      amount: @amount,
                                      description: 'Rails Stripe customer')

  rescue Stripe::CardError => e
    flash[:error] = e.message
    redirect_to new_charge_path
  end
end
Now if you run the application you'll see it's still working properly, so the refactor didn't break anything and now our code is much more flexible, nice work!
Make the amount charged and product description dynamic and shared throughout the charge process
All of these hard coded amounts and descriptions are making me reach for my Tums. Right now if you want to change the amount you'll need to change 4 different spots of the application across three files, that's not how we're going to choose to live our lives. When it comes to values like the amount to charge, we should only have to set it at one place, any more than that would be waste and would guarantee that at some point we'd forget to change one of the values and then we'd have a big problem.
Let's sit back and think about the best way to do this refactor:
Let's create a method where we set the amount value and store it in an instance variable
Let's add a
before_actionthat runs this method prior to thenewandcreateactions so they have access to the valueThen the views can render the value of the instance variable instead of hard coding the amounts
Since the amount needs to be in
cents, let's also create a view helper method that let's us have properly formatted amount values
Let's update the controller first:
# app/controllers/charges_controller.rb

class ChargesController < ApplicationController
  before_action :amount_to_be_charged

  def new
  end

  def create
    customer = StripeTool.create_customer(email: params[:stripeEmail],
                                          stripe_token: params[:stripeToken])

    charge = StripeTool.create_charge(customer_id: customer.id,
                                      amount: @amount,
                                      description: 'Rails Stripe customer')

  rescue Stripe::CardError => e
    flash[:error] = e.message
    redirect_to new_charge_path
  end

  private

    def amount_to_be_charged
      @amount = 500
    end
end
This cleans up the controller nicely, and our amount now only has to be set in one place and is available to the other two methods, this is a much better way to handle this flow. Depending on your app's needs you may not need this since you may be setting the values dynamically, such as a customer adding items to a shopping cart and having the total amount summed up, however this is a good way of isolating where the amount is set.
Now let's create the view helper so our views can render the amount properly:
# app/helpers/charges_helper.rb

module ChargesHelper
  def pretty_amount(amount_in_cents)
    number_to_currency(amount_in_cents / 100)
  end
end
This view helper method takes in the amount as an argument (notice how I also used Duck Typing to show that this amount should always in in cents?). Then it divides that amount by 100 to get the dollar value. Lastly it passes that value to the Rails number_to_currency method that will convert the value to a financial data format. As an example, this view helper method will take in a value such as 500 and output $5.00.
Now we can update the views so they're no longer hard coded values.
# app/views/charges/new.html.erb

<%= form_tag charges_path do %>
  <article>
    <% if flash[:error].present? %>
      <div id="error_explanation">
        <p><%= flash[:error] %></p>
      </div>
    <% end %>
    <label class="amount">
      <span>Amount: <%= pretty_amount(@amount) %></span>
    </label>
  </article>

  <script src="https://checkout.stripe.com/checkout.js" class="stripe-button"
          data-key="<%= Rails.configuration.stripe[:publishable_key] %>"
          data-description="A month's subscription"
          data-amount="<%= @amount %>"
          data-locale="auto"></script>
<% end %>
# app/views/charges/create.html.erb

<h2>Thanks, you paid <strong><%= pretty_amount(@amount) %></strong>!</h2>
Much better looking code, right? If you run this in the browser you'll see that everything is working. If you change the amount in the controller you'll see it populates everywhere. Nice work!
Now you probably already know how to do the same for the description since it follows the a similar pattern as above (except it doesn't require a view helper method), let's start by updating the controller with another private method:
# app/controllers/charges_controller.rb

  # at the top of the page
  before_action :set_description

    # in the create method
    charge = StripeTool.create_charge(customer_id: customer.id,
                                      amount: @amount,
                                      description: @description)

    # as a private method
    def description
      @description = "Some amazing product"
    end
Now you can update the view:
<!-- app/views/charges/new.html.erb -->

data-description="<%= @description %>"
If you test this in the browser you'll see that this is all working, very nicely done!
Create a true thank you page so that users aren't forwarded to a URL called create
I'm not a fan of sending users to a page with the URL of /create. I also don't like that we're using a template mapped to the create method. If we're following RESTful principles the create action shouldn't render a view, it should only create a resource. So let's fix this. Draw a new route for our charges controller under the resources call:
# config/routes.rb

get 'thanks', to: 'charges#thanks', as: 'thanks'
Now create a new method in the ChargesController:
# app/controllers/charges_controller.rb

  def thanks
  end
This method will automatically have access to the @amount and @description instance variables. Now let's update the create action so it redirects the user instead of trying to render the create.html.erb template:
# app/controllers/charges_controller.rb

  def create
    customer = StripeTool.create_customer(email: params[:stripeEmail],
                                          stripe_token: params[:stripeToken])

    charge = StripeTool.create_charge(customer_id: customer.id,
                                      amount: @amount,
                                      description: @description)

    redirect_to thanks_path
  rescue Stripe::CardError => e
    flash[:error] = e.message
    redirect_to new_charge_path
  end
Now let's create the template file by copying the create file over and then deleting the create file:
cp app/views/charges/create.html.erb app/views/charges/thanks.html.erb
rm -rf app/views/charges/create.html.erb
Now if you startup the rails server and test it out you'll see that everything is working and now we're redirected to the new Thanks page.
Force users to be signed in before purchasing and pre-populating the email address sent to stripe instead of having to force the users to type it in manually
I'm not a huge fan of forcing users to type their email address each time they want to purchase a product. I also don't want users that aren't logged into the application to be able to purchase anything (this is a pretty standard practice). So let's implement this feature. First let's block users from accessing any of the payment pages unless they are logged in. We can do this by adding another before_action to the charges controller, this time calling the Devise method authenticate_user! which will automatically redirect a user to the login page if they try to access any of the charges routes:
# app/controllers/charges_controller.rb

before_action :authenticate_user!
Now if users try to go to the charges/new path they'll be redirected to the login page and you can test this in the browser. That was easy, now that we know that a user will be signed in whenever they access one of the charge pages we can confidently call the current_user method and grab their email address to send to Stripe. To implement this feature, update the JavaScript code on the view by passing in another argument data-email="<%= current_user.email %>":
<!-- app/views/charges/new.html.erb -->

  <script src="https://checkout.stripe.com/checkout.js" class="stripe-button"
          data-key="<%= Rails.configuration.stripe[:publishable_key] %>"
          data-description="<%= @description %>"
          data-amount="<%= @amount %>"
          data-email="<%= current_user.email %>"
          data-locale="auto"></script>
Now if you startup the application, register for an account and go to charges/new you'll see that your email address is automatically added to the modal.

Add in the ability for customers to pay with Bitcoin instead of a credit card
The last refactor in this guide is going to be a walkthrough on how to integrate the ability to accept Bitcoin payments, don't blink or you might miss it. To make this happen update the script on the view again, this time passing in the attribute data-bitcoin="true"
<!-- app/views/charges/new.html.erb -->

  <script src="https://checkout.stripe.com/checkout.js" class="stripe-button"
          data-key="<%= Rails.configuration.stripe[:publishable_key] %>"
          data-description="<%= @description %>"
          data-amount="<%= @amount %>"
          data-email="<%= current_user.email %>"
          data-bitcoin="true"
          data-locale="auto"></script>
That's it, you're application now accepts bitcoin! You can see it for yourself here:

You should now have a solid idea on how to implement the ability to accept payments in a Ruby on Rails application using the Stripe gem.