- Read Tutorial
In past Gem guides we've walked through how to integrate Stripe charges and how to implement subscriptions in Stripe. Now let's walk through the process for using a custom form to collect the credit card information and pass it to Stripe. In the charge guide you saw how the Stripe JavaScript implementation supplied a popup form that communicated directly with the Stripe API. While the JavaScript integration works well for many applications, if your application needs a more custom payment page you'll need a different process.
If you want to follow along with where the application is at this stage you can get the code from the project repo.
Since this is a completely different process than the JavaScript implementation we'll create a different controller to manage this process. Let's create a controller:
rails g controller Payments new thanks
Let's update the routes file to use the standard RESTful routes and also make room for our thanks page (very similar to what we did in the previous tutorials).
# config/routes.rb

Rails.application.routes.draw do
  resources :payments, only: [:new, :create]
  get 'payment-thanks', to: 'payments#thanks', as: 'payment_thanks'
  resources :charges, only: [:new, :create]
  get 'thanks', to: 'charges#thanks', as: 'thanks'
  devise_for :users
  resources :posts
  root to: 'posts#index'
end
In a real world application we wouldn't have duplicate code like this, however in a real world application we also wouldn't have two different checkout pages. I'm not replacing the charges process because I felt like it would be helpful for you to see the differences side by side in the same application.
The first thing we need to do is call the Stripe API, we'll do this in the master application layout file because it's recommended that the script tags be placed inside of the <head> tags for cross browser compatibility.
<!-- app/views/layouts/application.html.erb -->
  <script type="text/javascript" src="https://js.stripe.com/v2/"></script>

  <script type="text/javascript">
    Stripe.setPublishableKey('<%= Rails.configuration.stripe[:publishable_key] %>');
  </script>
This is calling the Stripe API and passing in the API keys.
Now let's add in the form into the new template, here we're going to use the Rails form_tag method:
<!-- app/views/payments/new.html.erb -->

<%= form_tag payments_path, method: 'post', id: 'payment-form' do %>
  <span class="payment-errors"></span>

  <div class="form-row">
    <label>
      <span>Card Number</span>
      <input type="text" size="20" data-stripe="number"/>
    </label>
  </div>

  <div class="form-row">
    <label>
      <span>CVC</span>
      <input type="text" size="4" data-stripe="cvc"/>
    </label>
  </div>

  <div class="form-row">
    <label>
      <span>Expiration (MM/YYYY)</span>
      <input type="text" size="2" data-stripe="exp-month"/>
    </label>
    <span> / </span>
    <input type="text" size="4" data-stripe="exp-year"/>
  </div>

  <button type="submit">Submit Payment</button>
<% end %>
There are a couple items to notice here:
We're calling the
paymentscreateaction by passing in the pathpayments_pathto theform_tagmethod. This is possible because of how we setup our route file.The form itself doesn't use any Rails form elements, this is because the form is simply going to communicate with the Stripe API
Now let's add in some JavaScript code to the payments.coffee file:
jQuery ($) ->
  $('#payment-form').submit (event) ->
    $form = $(this)
    # Disable the submit button to prevent repeated clicks
    $form.find('button').prop 'disabled', true
    Stripe.card.createToken $form, stripeResponseHandler
    # Prevent the form from submitting with the default action
    false
  return

stripeResponseHandler = (status, response) ->
  $form = $('#payment-form')
  if response.error
    # Show the errors on the form
    $form.find('.payment-errors').text response.error.message
    $form.find('button').prop 'disabled', false
  else
    # response contains id and card, which contains additional card details
    token = response.id
    # Insert the token into the form so it gets submitted to the server
    $form.append $('<input type="hidden" name="stripeToken" />').val(token)
    # and submit
    $form.get(0).submit()
  return
This Coffeescript code performs a few actions:
It creates a secure token for sending the data to Stripe
It handles errors
It offers validation for the form
Now let's implement the payments controller. If you went through the previous lessons this is very similar to the ChargesController with a few changes, you can copy and paste this code into the controller. If you didn't go through the other Stripe guides, I'm using a custom class we created called StripeTool that is managing the Stripe API calls.
# app/controllers/payments_controller.rb

class PaymentsController < ApplicationController
  before_action :amount_to_be_charged
  before_action :set_description
  before_action :set_plan
  before_action :authenticate_user!

  def new
  end

  def create
    customer = StripeTool.create_customer(email: params[:stripeEmail],
                                            stripe_token: params[:stripeToken])
    charge = StripeTool.create_charge(customer_id: customer.id,
                                      amount: @amount,
                                      description: @description)

    redirect_to payment_thanks_path
  rescue Stripe::CardError => e
    flash[:error] = e.message
    redirect_to new_payment_path
  end

  def thanks
  end

  private

    def set_description
      @description = "Basic Membership"
    end

    def amount_to_be_charged
      @amount = 2999
    end

    def set_plan
      @plan = 9999
    end
end
The most important part of this code is the create action, this is where the customer creation and charge occurs. If you compare the ChargesController with the PaymentsController in the project you'll see both actions look for the same parameter. I like that Stripe made both implementations so similar, which makes it easier to switch between the JavaScript implementation and the custom form version.
Let's add some text to the thanks page:
<!-- app/views/payments/thanks.html.erb -->

<h1>You were successfully charged from the custom form!</h1>
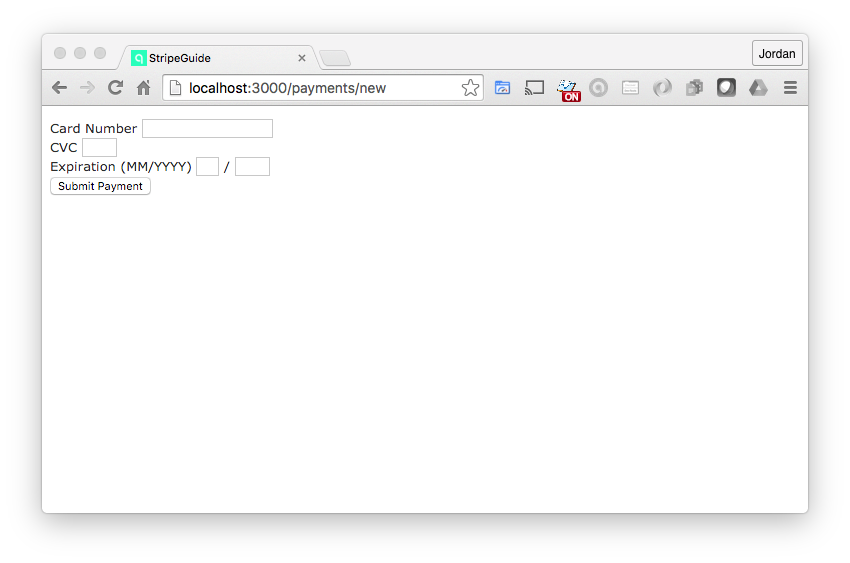
Now let's test it out and see if this all works. Startup the Rails server and navigate to localhost:3000/payments/new, you should see the custom credit card form here, such as in the image below:
If you fill out the form and submit you'll see that everything is working properly, very nice work, you now know how to implement both the built in and custom forms for Stripe in Rails.
One thing to keep in mind, it's strongly recommended that you get a SSL certificate if you're using the custom form implementation.