- Read Tutorial
- Watch Guide Video
Great job on going through that section. Our application forms are looking much better. They're what a user would typically expect to see when going and working with a modern application.
In this deep dive I want to take a sidestep and start working on how we can create a form completely from scratch. Rails is fantastic for giving us all kinds of great form helpers and that's really helpful and it's usually the way you're going to implement it in a real life application. However, it's also very helpful to know what is happening behind the scenes with the rails forms because if you ever have to do something such as perform debugging or get some very custom behavior from a form then it's important to understand what's happening. And one of the great ways of doing that is to build a form completely from scratch. And that's what we're going to do in this deep dive. We're going to build just a regular html form. Something that has no server side connection and then we're going to see all of the components that we need to implement in order to make it fully functional.
For this deep dive I've generated a very basic Rails application and I built a scaffold for a guide just so that we would have something that our new from scratch form can actually communicate to. So I'm going to open up Sublime Text and I'm going to delete the form. And if you want to take a look at the schema file, this is a guide that simply has a title and a content attribute.
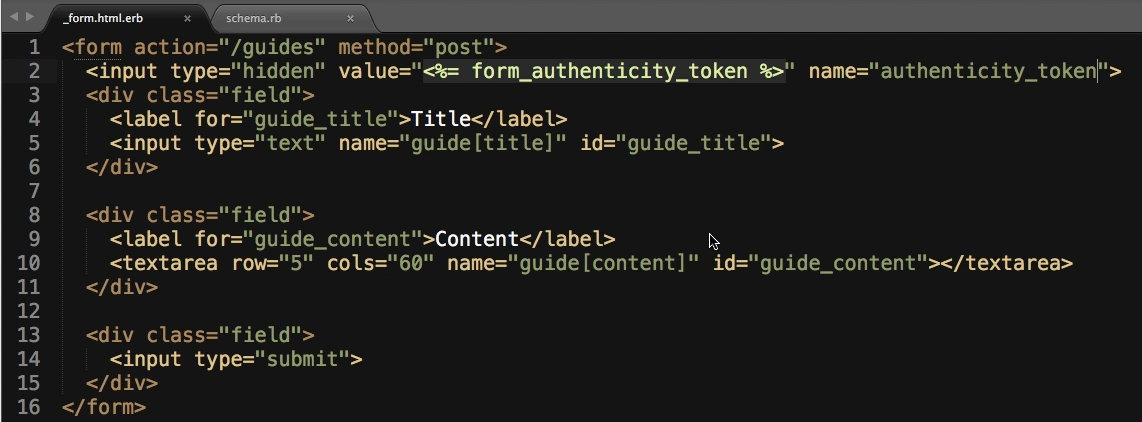
Let's talk about what we're going to need to do in order to build this. First and foremost, we're going to need a basic html form. The form by itself isn't going to do much good. So the first thing that we can think about adding is the path. Form in html needs to know what path to send the data to. In html that's called the action. Inside of the action we pass in a route. So in this case it's going to be guides. This form is saying that we are going to be a form that is going to send data to /guides and we also have to give it a method and the method is going to be of type post. If this was an edit form it would be of type put. If we were doing something like a search bar or something like that would be of type get. But for this one we're going to be doing a post.
<form action="/guides" method="post">

</form>
If I hit save and come and hit refresh right here everything's gone, but if I click on inspect we should see a form here somewhere. And yes we do. Right here you can see where it says form action guides method post.

Notice what we're essentially doing is we are creating the form from scratch. But if you inspect the form that Rail's generates it generates pretty much the exact same thing. So that's kind of important to know.
Next let's add some divs inside of here and give these a class of field. And the reason for that is because this is the class available from the scaffolds. So here if I paste this in now we're going to have two fields and actually we want one more for our submit button. We don't have to do anything with this it's simply going to be where we place our items. If we go back and look at the app right now nothing will have changed.
Now that we have that let's add a label tag. We're going to do this from scratch. Label and we're going to say label for and put in "guide" and remember that we need to use this syntax. We need to do guide title and that's all we need to put into our label. And now we can say title and close off our label. This is pretty much the same as if we were to be using form for and we would be saying f.label :title. This is what it generates for us. So that is what we need.
The next thing is we need an input. This input is going to be of type text since it's just going to be a regular text field. This needs a name which is going to be of guide title. And it also needs an ID. I'm not sure you remember from earlier but the syntax for this is guide_title and this is going to be everything that we need on the html input side.

If I hit refresh you can see we have a title and we have right here a label and a field. If you look at it and inspect it you can see that it's a div with a class of field and it has a label for a guide title, has a name and an ID, and actually made a little bit of a mistake here. This ID needs to be what is pointing to for the for not thename.

So if I hit refresh now our label is functional.

So that is the mapping for label for is to the ID.
Now that we have that let's copy this. And in fact we don't really need to copy the input because the next one's going to be a text area tag. Text areas in html are a little bit different. They don't start with input. They are an actual tag called text area. You could give it rows, you could give it columns, anything like that. So we can say rows five, and columns, which is actually represented by cols could say, let's say 60. Then from there we need to give it a name and an ID. The name is going to be guide. And this one's going to be content. And then the ID is going to be "guide_content". And we need to change up our for here and content. And this is also where we could do things like put placeholders or anything like that.

Now let's go back and refresh, and we almost have it right. Not quite but it looks like we have a extra div hanging around and that's because text areas are a little bit different. Notice with input's we don't have to close our input tag off. Text areas do need that closed off.

So now if I hit refresh you can see that that is now working and both of our labels are active.

The last thing that we have to do is we need to create one more input. This is going to be of type submit.

That is all we need to do here. If I hit refresh you can see we have a fully functional guide

and when I say fully functional I should say almost fully functional because this will send data but this will not work with Rails quite yet. So if I say guide one and put some content in here and hit submit this is going to throw an error.
Let's come in to the terminal and let's see what this error is. So right here it started the post to guides. So far so good. It was processed by the guides controller create method. That's exactly what we wanted to happen. It passed in parameters of guide which was nested with title and content. That is fantastic. Here is the problem.

Can't verify CSRF token authenticity, and it completed the 422 error with Unprocessable Entity in one millisecond and the formal error is action controller invalid authenticity token.
So that is the token and what exactly does this do? Why do we need this and what exactly is the matter with our code here? Well the problem with this is this is how forms were created years ago. When I started building PHP applications years ago this was how I built a form. I would put in all the values, and the method, and all of those kind of good things and then pass it in, and then that data would be taken in by some type of controller pass a database saved, everything there would work but there was a problem. Hackers started to realize that if they could put the right type of malware on a system, if they could do what's called "hijacking a session" they could actually take and submit form information into the application. They could do what we did right here and submit this in. Some of the more famous times when this would happen early on, I'm talking about, 15, 20 years ago, is with banking or financial institutions where a hackers was able to hijack the session and they would say, I want you to send a million dollars to this bank account, and perform some type of transaction and the user technically never even did anything but because their browser was essentially compromised, or I should say their system was compromised, there were some background processes that were being processed where a user could simply hijack that session, submit all the form fields with any information they wanted and bypass things such as typing in a username and password and those kind of credentials. What modern web frameworks have implemented is a way of ensuring that only a user who's actually on the system is the one submitting the form, and that is what this token does.
I will walk through now how we can create this manually. At the very top I'm going to use some imbedded Ruby, and I'm going to create a hidden field tag. Technically we could also just create an input tag of type hidden. You know what? I think I'm going to do that because so far I've been very good about keeping this 100 percent just html, so why mess with this? This is going to be of type hidden. So this is how you create a hidden form element. The value here is what we're going to pass. And this does need a little bit of Ruby or else it won't work because what we're going to be tapping into here is a tool that gets used. This is going to be the form authenticity token, and this is a generator. And we also need to pass in the name, and we may have to pass in the ID, I'm not sure, we will find out if it throws an error at us. So this is going to take a name of authenticity token, and hit paste.
Let's come and see if this works now. If I hit refresh no errors. Also if you look you can see there is a hidden form field called input hidden with these values with name of authenticity tokens. So far that looks good.

Hit submit. And look at that. It is working.

So that is what we need to do in order to ensure that our forms are as secure as we can make them.
Let's test this out again. If I hit new guide, I want to show you what this is actually doing behind the scenes. So coming down let's click on this value and let's come down and paste it in and I'm going to come back and hit refresh again. Let me copy this value again and look at this. We have two completely unique tokens.

This is where our little generator here comes in handy. What it's doing is taking this process where it's generating this long string of items and it is saying that it will only accept your form input. I will only let you process this guide if you have this authenticity tokin and then that it matches something on the server side to ensure that it is authentic. So this is very important to make sure that what you're submitting from a form perspective is actually something that you wrote.
I think this is helpful. When I was originally learning how Rails worked I was really confused because they had all these cool generators, like these scaffolds, and these types of things, and even items like form tag. Form tags, which we went through earlier in the section it seemed pretty manual but after a little while you could see there was still a lot of rails magic that was happening and there was still a lot of items that were being generated. At the end of the day all it's doing is what we just did right here. Just some very basic html. They come in very handy because they will do things like pre-populate our forms and they build in things like the form authenticity token and those kind of things for free. It also can dynamically change the method based on if you're on the new or if you're on the edit page. There's a lot of cool things but at the end of the day what I wanted you to see was that all we're doing here is html because at the end the day the browser can only interpret HTML, CSS, and JavaScript. If you try to pass in anything that is not one of those three items then it is not going to work and it's not going to know what to do with it. That is why these helper methods are the ones that you will see in form for and form tag.

All they're doing is they're making it easier for us to generate this type of code so that browsers are able to read it in. And all of that being said, you're usually going to be using form for or form tag whenever you're building your own apps.
I do find it helpful to know exactly what's going on behind the scenes because one of the questions I get asked the most, and this has been over the years I've gotten this asked ever since I started teaching rails, was how in the world would I know how to take feature X Y and Z and go build it. I know how to follow a tutorial but how would I know how to go and build something that I don't have a tutorial for. And my answer is, learning exactly what we're doing here. Breaking apart how Rails works. There's a reason why this course is called "Dissecting Rails" because I feel like one of the best ways to understand how Rails works is to look at each one of the components and see, okay what is happening behind the scenes, whether it is a form, whether it's a generator, whether it is dataflow in the router or the controller. Seeing what it's actually doing. And here we can see with our forms it's just generating html. It's really nice and straightforward in that sense where it may do a lot of things behind the scenes to make life easier for us but at the end of the day we end up with code that looks pretty much like this. And now you know how to build that yourself.
You now know the first part of it, how to use the generators, how to customize those type of forms, and then now you know what it creates, and why it's also a good idea to use those items.
I hope that this deep dive is giving you a good idea for how forms work. Not just in Rails but also how forms work in general and that helps you connect with what Rails does for us to make forms and management of forms more efficient.