- Read Tutorial
- Watch Guide Video
As we continue this deep dive we are going to walk through how we can connect our app to the AWS or the Amazon Web Services API for their S3 service. If you come to the aws.amazonacom and click sign into the console you will be taken either to the logon page or if you're already logged in then it's going to take you to that dashboard itself. On the management panel you can see all of the services, AWS has a ton of them I'd definitely recommend for you to see which ones you think would be a good fit for you in the future. I specifically use S3 for storage and cloud front for CDN services.
If you come down to storage, click on S3 and this is going to give you access to all of the buckets. In AWS terminology is where you store images or videos This is going to give me everything I need to upload images, store them and then call them from apps. You can use S3 to connect to your apps. Or you could just use it for storage.
We need to create a connection between AWS and our app. We're going to do is take advantage of the dotenv-rails gem. We added that in the last guide. It gives us the ability to create a .env file, click on where it says devcamp portfolio, hit save and type .env. Sublime text will give a message, just hit "use." Type in the following into the file:
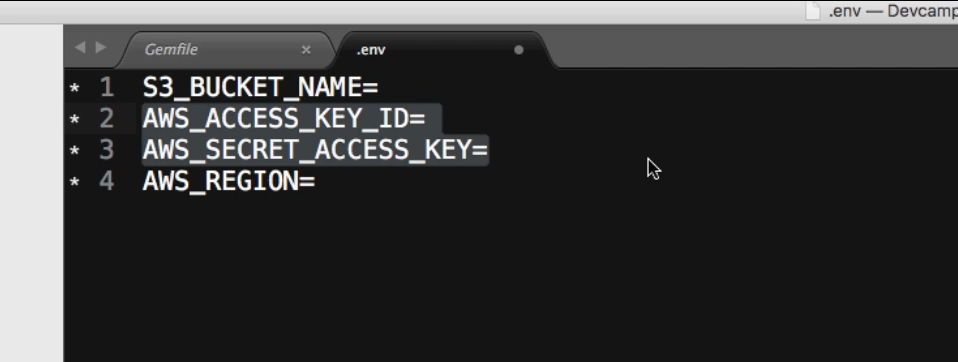
We are going to retrieve these items. Now a couple of these items, I can't show you where specifically to go get those because if I did then you would see mine and then I could run the risk of having a really nasty attack if someone watching this wanted to use these.
Let's also take a look at our gitignore file and add .env at the bottom so no one would be able to view that file. Hit save.
I'm going to show you how to get these items, however, you also need to go into your own AWS account and get your access key ID and your AWS secret access key. If you open up Google Chrome, click on your name then click on my security credentials you will find them there.
Let's create a bucket. in S3 click on bucket, bucket names have to be unique. I'm going to say devcamp-portfolio-bucket. In the region, depending on where you are, select the closest region and click on create to generate a bucket. Select the new bucket and click on properties, this is going to show some important information. If we type in U.S. space region in the .env file it will cause all kinds of errors, we actually want to come up to the URL bar, you can see that the region is sa-east-1. That's what we want, paste that into the .env file. Add in the name of the bucket (devcamp-portfolio-bucket).
We can test it out, come into the terminal and type rails c We should be able to run ENV.fetch('S3_BUCKET_NAME') and it should show the name of the bucket. Sometimes you need to forcefully bring in the .env file, if you have some issue with your calling that from the console and it's not working what I've used in the past is by saying require "dotenv-rails" in the application.rb and typically that fixes it.
I'm going to pause a video and a place in my own access key and my secret access key and then close out of this file. We will finish up the installation after that.
If you're following along you should now have your credentials securely stored in your .env.
Go to rubygems.org I'll show you how to grab the rest of the instructions. Type carrierwave-aws then click home page. This is how you can connect to AWS. I'm just going to copy the instruction and we're going to create a special file. Click on config/initializers and create a new file carrierwave.rb and I can paste all of these in.

Let's open up our uploader, change storage :file to storage :aws
Let's start up the rails server. This should be pointed to our bucket. Let's edit a portfolio, click "choose file" and pick out a large image and then a small one. Save the portfolio item and that looks like it worked.
If I right click on this and click open image in new tab you'll see that now the URL is pointing to devcamp-portfolio-bucket.s3.amazonaws.com and then also notice the path is the same one set up in our uploader.
If I come into the console here and if I hit refresh you're going to see that we have uploads, portfolio, we have main image and it has that exact same thing. If I click on properties you can see that this has a link right here.
Let's take a look in the console rails c and type portfolio.find(22).main_image. As you can see, this looks very different. Even though this is our plain old image item and this is just an attribute in the database. This is more like a Ruby object, it has a connection to the model, it has a connection string for the AWS resource that has a link to the path.
- git status
- git add .
- git commit -m "Fnished carrierwave installation"
- git push origin image-management
One last thing, I want to talk about how we can get much better-looking buttons.
I am going to clear off our pivotal tracker task, I think we are done here. We can click finish, deliver and accept
In the next guide we're going to walk through how we can implement some better-looking buttons for our file uploader.